
The contract builder lets you draft agreements as structured blocks instead of a frozen file: write the content, drop in the fields each party will fill, and render a clean PDF or Word document when you're done. Contracts built here connect straight into e-sign.
Start a contract
- On the Documents page, open + New and choose New contract.
- Under Start from, keep Blank contract or search for a template by name; each result shows whether it is a workspace or platform template. Picking one shows its variables to fill.
- Give the contract a title. The title is the document's name in the library and on downloads; it is not printed on the page. Add a Heading block for the visible title of the agreement.
- The document opens in the Builder tab of its workspace. Everything autosaves as you type.
Draft with AI
If the Legal AI Co-pilot is enabled for your workspace, an empty contract opens with a Draft with AI card. Say what the document is (for example "Mutual NDA"), optionally name the counterparty, the governing law and any key terms, pick a model, and click Draft with AI. The whole agreement lands as editable blocks: headings, numbered clauses with sub-clauses, and an Execution section for you to add signature fields to. Your company details are used for the first party. Facts the AI does not know are written as placeholders such as {{counterparty_name}} rather than invented, so fill or remove them before sending. Each draft costs the model's credit weight; nothing is charged if drafting fails.
Inside any contract, Generate section with AI in the right-hand panel drafts one section from a short description and inserts it after the selected block, following the document's defined terms and numbering. Delete or edit it like any other block.
The rail
The panel on the right is the same rail as in Preview: Blocks (the palette of content, input and layout blocks, plus Generate section with AI and Save as template), Details, Comments, Versions and AI review. So comments and the AI review are available while you write, and a review recommendation can be inserted straight into the open document.
Content blocks
Add blocks from the palette:
- Text, with rich formatting: bold, italic, underline, bulleted and numbered lists, alignment (including justify), font choice, sizes, text color, and highlights. Lists nest up to three levels: press Tab (or the indent button) on an item to nest it, Shift+Tab to bring it back. Nested numbering reads 1. / a. / i. by default; the 1.a / 1.1 control on the toolbar switches a block to outline numbering (1. / 1.1 / 1.1.1). Tab on a plain paragraph indents it. The editor shows the same numbers the PDF and Word output print.
- Lists that continue past a table or image. Blocks never nest, so a table, image or callout placed in the middle of a clause sits between two text blocks. Open the List control on the toolbar of the second block and tick Continue previous list: numbering carries on from the block above (4.2 follows a table placed after 4.1), with sub-levels intact. Start at sets the first number of a block explicitly, for a schedule or an annex that resumes at a given clause. A text block holding only plain paragraphs between the two parts does not break the chain.
The formatting toolbar stays pinned at the top of the block while you scroll through a long clause.
- Headings and tables. Table cells wrap at the column width and take line breaks: press Enter inside a cell for a new line (the fee tiers of a pricelist, for example). Columns on the table's bar sets each column's relative width and alignment; Indent moves a table, image or callout in by one to three list levels so it sits under the clause it belongs to.
- Callouts for boxed notes
- Dividers, spacers, and page breaks to control the printed layout
A keep with next toggle on content blocks stops a heading from being stranded at the bottom of a page.
Input blocks
Input blocks are the parts a person fills:
- Field: a labeled free-text input
- Date and checkbox
- Signature: type, draw, or upload a signature
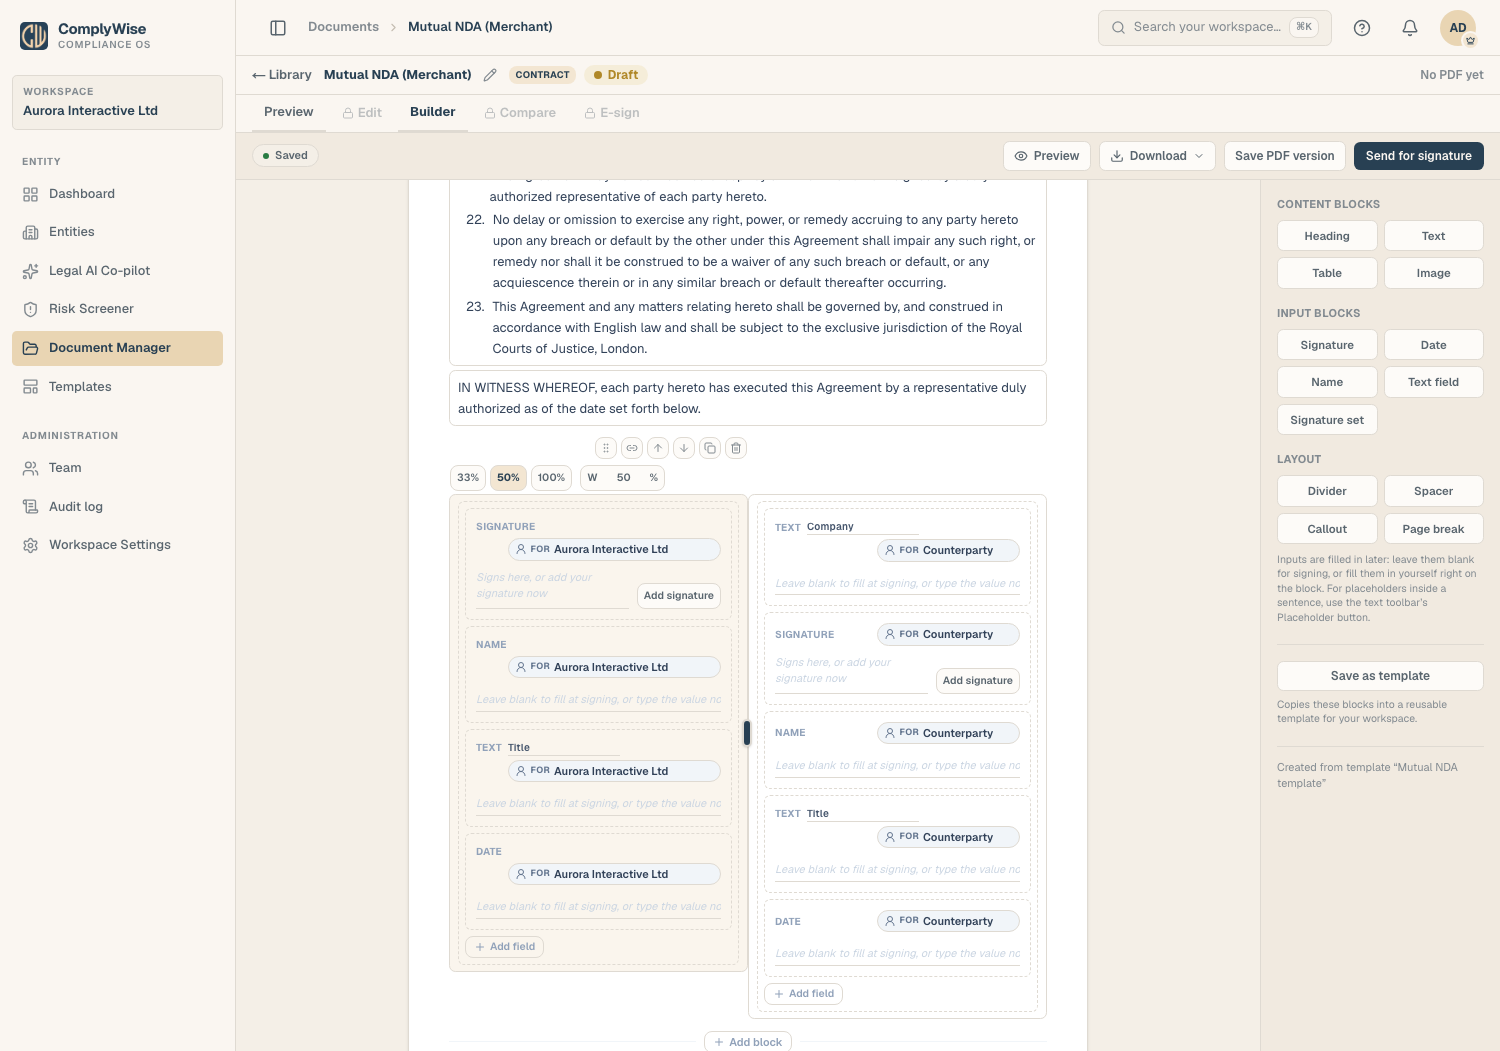
- Signature set: a one-click column of signature, name, and date for one party; place two sets side by side for a classic two-party execution block
Each input carries a For tag naming the party it belongs to (for example Client, Provider). Type a party name into the tag; existing parties are suggested so every field for the same party uses the same name. You can fill inputs yourself in the builder, or leave them for signers.
Arrange the layout
- Drag the grip on any block to reorder it.
- Blocks narrower than the full width flow side by side into rows; drag one next to another to pack them, with snap guides at common widths.
- Resize a block's width by dragging its edge.
Placeholders
Type a placeholder like {{effective_date}} anywhere in text, or insert one with the Placeholder button. Placeholders are what make a contract reusable:
- While unfilled, they render as a labeled blank line in the preview and in every export, never as literal braces.
- When the contract is saved as a template, each placeholder becomes a fillable variable the next user completes.
Render and send
- Save PDF version renders the contract to a PDF version of the same document; a Word download is available too. The rendered page contains your blocks only; the document title is used as the file name.
- Send for signature goes one step further: ComplyWise renders the latest content, creates one recipient per party label, and pre-places the signature fields exactly where your signature blocks sit, so the envelope arrives on the send page ready to go.
Related articles
- Use templates: start from a template or make your own
- The document workspace: the Builder tab in context
- Work with versions: rendered PDFs in the history